
The machine is a four-axis horizontal boring mill. It can operate in either a horizontal format, or in a vertical format using a right-angle head attached to the spindle face.
In the horizontal milling format, axis movement is as follows:
| X | Table left/right |
| Y | Head up/down |
| Z | Bar in/out |
| W | Saddle out/in |
In the vertical milling format, axis movement is as follows:
| X | Table left/right |
| Y | Saddle in/out |
| Z | Head up/down |
The Machine Home position is with the table fully to the left; head all the way up; saddle away from the column; and, if in the horizontal format, bar fully retracted.
|
The control starts up in Incremental jog mode. In order to jog the axes in continuous movement, you need to press the INCR/CONT key to switch from incremental to continuous jog mode. |
The switch between horizontal milling and vertical milling formats is accomplished by swapping control configuration and parameter values, and of course by installing or removing the right-angle head.
After swapping configuration and parameter files, the control must be shut down, powered off, and powered back up in order for the change to take effect.
It will be easier to install and remove the right-angle head while the control is configured for horizontal milling operation. Therefore you should install the right-angle head just before switching the control from horizontal to vertical; and you should remove the right-angle head after switching the control back from vertical to horizontal.
This is because in horizontal mode you can control the bar, as the Z axis. In vertical mode you cannot move the bar.
 The work light
will come on automatically when the machine is powered up.
The work light
will come on automatically when the machine is powered up.
You can turn the light off and on by pressing the work light key on the jog panel.
You can control spindle rotation speed and direction manually with jog panel keys, or automatically with program codes.
The spindle must be in Auto mode in order to use programmed M and S codes. The spindle must be in Manual mode in order to use the jog panel keys.
 |
Switch between Auto and Manual control modes. |
In manual mode, you can control operation and direction with these keys:
 |
Select spindle forward (CW) |
 |
Select spindle reverse (CCW) |
 |
Start spindle |
 |
Stop spindle |
In Auto mode, you can control operation and direction with these codes:
| M3 | Start spindle forward (CW tool) |
| M4 | Start spindle reverse (CCW tool) |
| M5 | Stop spindle |
| Snnn | Set speed to nnn RPM |
In either mode, you can further control speed with these keys:
 |
Increase speed |
 |
Set speed to 100% of programmed speed (Auto mode) or to half of maximum speed (Manual mode) |
 |
Decrease speed |
The machine has a hydraulically shifted 4-speed gearbox.
Gear shifting is always done with M functions, either in a CNC program or at the MDI prompt:
M44 |
High range | (1251-3150 RPM) |
| M43 | Medium-high range | (481-1250 RPM) |
| M42 | Medium-low range | (191-480 RPM) |
| M41 | Low range | (1-190 RPM) |
| M49 | Shift to best range for programmed RPM |
In automatic operation, the M3 and M4 codes call M49 at every spindle start, automatically shifting ranges as needed.
You only need to enter M41 - M44 for manual operations.
M41 - M44 require that spindle control be in Auto mode. For use in Manual mode, switch to Auto; run the gear shift M function; and switch back to Manual.
In manual operations, it is possible to run slower than the minimum for each range listed above. For example, the minimum possible speed in high range is about 60 RPM. Thus extra shifting can be avoided, as long as full torque is not required.
You can take the spindle out of gear using the Aux4 key on the jog panel:
 |
Free spindle (shift to neutral) |
The control will automatically operate the way lube pump any time the hydraulic pump is running. The way lube system will not operate when the machine is in an emergency stop or fault condition.
The control will direct way lube to the X, Y, and/or W axes whenever that axis is moving, whether via an automatic program cycle or manual jogging.
If the control is directing way lube to an axis, but the lube pressure switch on that axis fails to show pressure for the time specified in Parameter 953 (in milliseconds), then a fault will be triggered.
If the lube pump itself fails to build output pressure within the time
specified in Parameter 954 (in milliseconds), then a fault will be triggered.
G28 Return Point
Most CNC programs will return the Z axis to the G28 return point (return point #1) at the start and end of a job. The control will also move Z to that position at any M6 tool change code, any M25 Z-to-home code, or any press of the Tool Check key.
By default, the Z position for the G28 return point is machine zero, which is fully retracted (in horizontal mode) or all the way up (in vertical mode).
If tooling temporarily prohibits fully retracting the quill; or you want to save time by not fully raising the head, you can change the Z position for G28. To do so:
The Auxiliary keys on the jog panel have the following functions:
 |
No function |  |
Indicates probe trip |  |
Spindle Brake Mode Auto/Off |
|
Spindle Neutral |  |
No function |  |
No function |
|
Work Light Off/On |  |
No function |  |
No function |
| (Aux10) | No function | (Aux11) | No function | (Aux12) | No function |
| M0 | Stop (wait for Cycle Start) |
| M1 | Optional Stop (wait for Cycle Start) |
| M2 | Program Restart (with wait for Cycle Start) |
| M3 | Spindle CW / Forward |
| M4 | Spindle CCW / Reverse |
| M5 | Spindle Stop |
| M6 | Tool Change |
| M7 | Mist Coolant On |
| M8 | Flood Coolant On |
| M9 | Coolant Off |
| M19 | Set spindle brake Auto mode |
| M20 | Set spindle brake off |
| M41 | Shift to low gear (1-190 RPM) |
| M42 | Shift to 2nd gear (191-480 RPM) |
| M43 | Shift to 3rd gear (481-1250 RPM) |
| M44 | Shift to high gear (1251-3000 RPM) |
M functions M91 and above are used internally in custom macro programs, but are generally not used directly in user machining programs.
See Chapter 13 of the Centroid M-Series Operator's Manual for descriptions
of the higher-numbered M functions.
Machine Parameters Summary
The following parameters on the Centroid Machine Parameters table are used for features specific to this machine.
| Parameter | Meaning | Value | Notes |
|---|---|---|---|
| P57 | Load meter display | 63 | Show meters for axes 1-5 plus spindle |
| P902 | Machine format selection | 0 or 1 | 0 = horizontal milling, 1 = vertical milling |
| P950 | Hydraulic startup time (ms) | 6000 | Time to allow hydraulic pumps to start, before monitoring output pressure |
| P951 | Hydraulic pressure loss detection time (ms) | 1000 | Allowed time for hydraulic pressure to dip, before triggering fault |
| P952 | Scavenger pump off-delay time (minutes) | 2 | Time to continue running scavenger pump after emergency stop is pressed |
| P953 | Way lube cycle time limit (ms) | 30000 | Fault if way lube pressure switch on an axis remains open this amount of time |
| P954 | Lube pump pressure time limit (ms) | 18000 | Fault if lube pump output pressure switch remains open for this amount of time |
| P961 | Spindle RPM for gear shift assist | 60 | RPM to bump motor while helping gears to mesh |
| P990 | Spindle load meter scale (Volts) | 10.0 | Analog volts from GS4 spindle drive, for full-scale motor load |
| P991 - P995 | Servo load meters scale (Volts) | -2.5 | Analog volts from Yaskawa servo drives, for full-scale motor load |
For all other Machine Parameter functions, see Chapter 14 of the
Centroid M-Series Operator's Manual.
Yaskawa Servo Drive Parameter Settings
Most servo drive parameters are set to factory defaults.
The following parameters are set to values other than factory defaults:
| Parameter | Value | Meaning |
|---|---|---|
| Pn000 | 0010 | Position control mode |
| Pn002 | 0100 | Use absolute encoder as incremental |
| Pn170 | 1400 | Disable tuning-less function |
| Pn200 | 0004 | Position control by A/B phases, 4x multiple |
| Pn20E | 1048576 | Electronic gear ratio numerator |
| Pn210 | 32768 | Electronic gear ratio denominator |
| Pn212 | 8192 | Encoder output cycles/revolution |
| Pn50A | 8101 | Disable P-OT input |
| Pn50B | 6548 | Disable N-OT input |
| Pn50E | 3200 | Remove /COIN and /V-CMP from output SO1 |
| Pn50F | 0100 | Put /BK (brake release) on output SO1 |
See the Yaskawa Sigma V series user manual for detailed
information on these and other servo drive parameters.
DuraPulse GS4 Spindle Drive Parameter Settings
Most spindle drive parameters are set to factory defaults.
The following parameters are set to values other than factory defaults:
| Parameter | Value | Meaning |
|---|---|---|
| P0.00 | 460VAC | Motor maximum output voltage |
| P0.01 | 37.0A | Motor rated current |
| P0.02 | 60Hz | Motor base frequency |
| P0.03 | 1770RPM | Motor rated RPM |
| P0.04 | 120Hz | Maximum output frequency |
| P0.08 | 30HP | Motor rated HP |
| P1.00 | 1 | Stop method (coast to stop) |
| P1.01 | 5.0s | Acceleration time 1 |
| P1.02 | 8.0s | Deceleration time 1 |
| P1.04 | 10.0s | Deceleration time 2 |
| P1.16 | 1 | Deceleration transition by frequency |
| P1.18 | 90Hz | Deceleration transition frequency |
| P1.29 | 0 | Deceleration method: normal ramp |
| P2.11 | 1 | Control mode: sensorless vector |
| P3.00 | 1 | Source of operation command (terminals) |
| P3.06 | 5 | Terminal DI4 function (reset) |
| P3.18 | 32 | Relay 2 function (zero speed) |
| P4.00 | 2 | Source of frequency command (analog input) |
| P4.50 | 3 | Analog output 1 function (output current) |
| P6.11 | 1 | Overvoltage stall prevent: disabled |
| P6.12 | 0 | Overvoltage stall prevention method: traditional |
| P6.27 | 780VDC | Overvoltage stall prevention level |
| P6.28 | 720VDC | Dynamic braking voltage level |
| P6.71 | 1 | STO alarm latch OFF |
| P8.00 | 3 | Display DC bus voltage on status display |
See the DuraPulse GS4 AC Drive User Manual for detailed
information on these and other spindle drive parameters.
Troubleshooting
Any time the control cannot complete its tasks normally, it will display a message in the scrolling message box, in the upper right corner of the screen, explaining what went wrong. You can use the mouse to scroll up (back) in the message box to view the most recent 10 or so messages.
You can view older messages in the error message log, accessible from the F7/Utility menu:
Most common messages are described in Chapter 15 of the Centroid M-Series Operator's Manual.
The machine-specific PLC program can generate several of its own
fault, error and warning messages, in
addition to those listed in the Centroid operator's manual.
The machine-specific messages are listed later in this section.
PLC Diagnostic Display
You can use the PLC Diagnostic display on the console to view some of the Centroid PLC input and memory locations mentioned with these fault and error conditions. At the control's main screen, press Alt-I to activate the PLC Diagnostic display. Press Alt-I again to dismiss it.
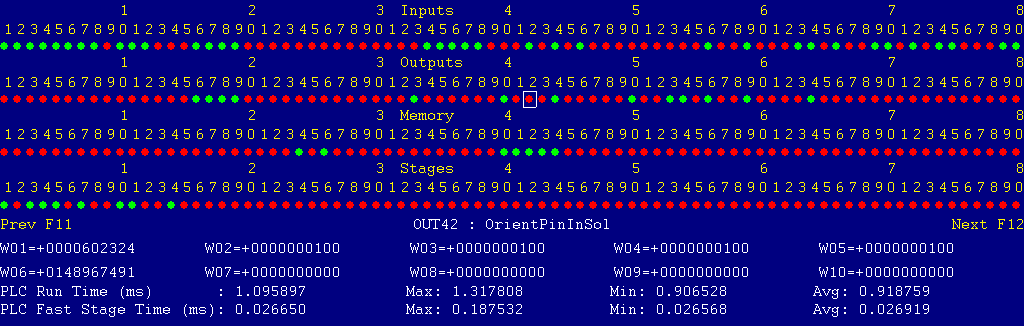
Each page of the Diagnostic display shows four rows of red and green dots: the first row shows PLC inputs 1 through 80; the second row PLC outputs 1 through 80; the third row PLC memory bits 1 through 80; and the fourth row PLC program stages 1 through 80.
You can use the arrow keys to move a highlight box over any of these locations. The name of the highlighted location will be displayed in the center of the screen below the red and green dots.
For example, in the illustration above the highlight box is on Output #42: The dot below the 2, to the right of the superscript 4, on the second line.
Below the four rows of bit status information are ten numeric ("word") variable values, labeled W1 through W10. Some of these variables also hold useful status information, described with the error and fault conditions to follow.
There are multiple pages of Diagnostic data. With the Alt-I diagnostic display showing, you can use the F12 and F11 keys to scroll right and left. For example, pressing F12 once will shift to the page showing inputs and outputs 81 through 160, and word variables W11 through W20.
Messages with 9000-series message numbers are Faults. After resolving the problem, you must press and release the Emergency Stop button to clear a Fault.
Messages with 8000-series message numbers are Errors. Errors will cancel the program cycle and stop the spindle and coolant, but they do not then need to be explicitly reset.
Messages with 5000-series and 2000-series message numbers are Warnings
and Informational Messages. They do not cancel the cycle or require
any action to reset.
Opening the Control Cabinet Doors
In some cases, it will be necessary to open the control cabinet doors while power is on. For example, servo drive and spindle drive fault conditions can be more readily identified using the codes displayed on, or stored in, the drive units themselves.
WARNING: Use appropriate caution when working in the control cabinets while power is on. Lethal voltages, up to 480VAC and 700VDC, are present on many components.
The left and center doors are mechanically interlocked with the right-hand door.
They can only be opened while the right-hand door is open.

To open the right-hand control cabinet door while power is OFF:
To open the right-hand control cabinet door while power is ON:
To open the center or left-hand control cabinet door:
The control detected an internal error in processing the PLC logic program.
Report this error to your dealer, along with the values from W14 and W15. Also report what function the machine was performing when the fault occurred.
You must shut down and cycle the power to clear this fault.
References:
PLC W14: Copy of internal SV_PLC_FAULT_STATUS, indicating the type of problem
PLC W15: Copy of internal SV_PLC_FAULT_ADDRESS, indicating the location of the problem
The GS4 spindle drive (VFD) is reporting a fault condition.
This may occur if emergency stop is pressed, and then released within less than five seconds. In this case the safety relay (SR1) does not have time to reset, and so does not close again when emergency stop is released. Press emergency stop; wait at least five seconds; then release emergency stop.
Other spindle faults may result from over-voltage while decelerating, or from overload during spindle reversal (e.g. in a tapping cycle).
If the cause is not immediately evident, then check the LCD display on the spindle drive itself, in the rightmost section of the cabinet.
You can review past drive fault conditions using the GS4 drive's parameters menu. The six most recent fault codes are in parameters P11.04 through P11.09. See chapters 3 and 4 of the GS4 drive manual.
References:
PLC INP10: Spindle drive fault signal:  Green = 1 = Okay, Red = 0 = Fault
Schematic: Lines 5, 115
The control unit detected loss of communication from the operator panel in the console.
Check for damage or disturbance to the cables between the console and the Oak control unit in the control cabinet.
Press and release Emergency Stop to clear the fault.
References:
Schematic: Lines 91, 103
The operator panel reported back to the control unit a loss of communication from the control unit. This indicates the return signal from the operator panel is functioning normally, but the outgoing signal may have problems.
Check for damage or disturbance to the cables between the console and the Oak control unit in the control cabinet.
Press and release Emergency Stop to clear the fault.
References:
Schematic: Lines 91, 103
The way lube system tried to lube one of its three zones (X, Y or W), but the associated pressure switch did not close within the allowed time, to show that the lube operation was successful.
Check for signs of oil flow to each area of the machine.
Press and release Emergency Stop to clear the fault.
References:
PLC W8: Active zone:  0 = X, 1 = Y, 2 = W
PLC INP17: X lube final-point pressure switch:  Green = 1 = Pressure, Red = 0 = No pressure
PLC INP18: Y lube final-point pressure switch:  Green = 1 = Pressure, Red = 0 = No pressure
PLC INP19: W lube final-point pressure switch:  Green = 1 = Pressure, Red = 0 = No pressure
PLC OUT17: X lube cutoff solenoid:  Green = On = Flow blocked, Red = Off = Flow permitted
PLC OUT18: Y lube cutoff solenoid:  Green = On = Flow blocked, Red = Off = Flow permitted
PLC OUT19: W lube cutoff solenoid:  Green = On = Flow blocked, Red = Off = Flow permitted
Schematic: Lines 122-123, 169-171
You exited the CNCM control software without first pressing Emergency Stop.
Always press Emergency Stop prior to exiting the control software.
Press and release Emergency Stop to clear the fault.
The hydraulic system was running, but main hydraulic pressure dropped out.

Check the oil level in the hydraulic unit sight glass.
Press Emergency Stop to clear the fault. Release Emergency Stop and check the pressure gages on the hydraulic unit. The main pressure gage (lower left) should show 1800 PSI.
References:
PLC INP33: Pressure switch PS1 status: Green = 1 = Pressure up,  Red = 0 = low or no pressure
Machine Parameter 951: Allowable pressure-drop time before fault is reported (ms)
Schematic: Lines 40-43, 132
The hydraulic system was running, but pressure for the Y axis counterbalance cylinder dropped out.
Check the oil level in the hydraulic unit sight glass.
Press Emergency Stop to clear the fault. Release Emergency Stop and check the pressure gages on the hydraulic unit. The counterbalance pressure gage (lower right) should show about 1575 PSI.
References:
PLC INP34: Pressure switch PS2 status: Green = 1 = Pressure up,  Red = 0 = low or no pressure
Machine Parameter 951: Allowable pressure-drop time before fault is reported (ms)
Schematic: Lines 40-43, 132
The hydraulic system was running, but pressure for headstock lubrication dropped out.
Check the oil level in the hydraulic unit sight glass.
Press Emergency Stop to clear the fault. Release Emergency Stop and check the pressure gages on the hydraulic unit. The lubrication pressure gage (upper left) should show about 95 PSI.
References:
PLC INP35: Pressure switch PS11 status: Green = 1 = Pressure up,  Red = 0 = low or no pressure
Machine Parameter 951: Allowable pressure-drop time before fault is reported (ms)
Schematic: Lines 40-43, 133
The oil temperature in the hydraulic unit is too high.
Press Emergency Stop to clear the fault. Investigate possible causes of hydraulic overload. Wait for the oil to cool back to an allowable temperature before releasing Emergency Stop to resume work.
References:
PLC INP41: Thermal switch TAS24 status: Green = 1 = okay, Red = 0 = hydraulic oil overheated
Schematic: Line 136

The flood coolant pump motor tripped the overload relay (OL4) on its starter (M4).
Check the overload relay, on the lower right panel, for a trip indication. Check the flood coolant pump and reservoir for possible causes of overload.
Press the white RESET button on the tripped overload. You may have to wait several minutes for the overload to cool before it can be reset.
Press and release emergency stop to clear the fault condition.
References:
PLC INP13: Trip indication from OL4.  Green = 1 = Tripped, Red = 0 = Okay
Schematic: Lines 45, 117
The hydraulic oil scavenger pump motor on the under side of the headstock tripped the overload relay (OL12) on its starter (M12).
Check the overload relay, on the lower right panel, for a trip indication. Check the scavenger pump and motor for possible causes of overload.
Press the white RESET button on the tripped overload. You may have to wait several minutes for the overload to cool before it can be reset.
Press and release emergency stop to clear the fault condition.
References:
PLC INP14: Trip indication from OL12.  Green = 1 = Tripped, Red = 0 = Okay
Schematic: Lines 47, 117
The spindle motor was running hot enough to trip its thermal switch.
Investigate possible causes for overload or overheating.
Wait for the motor to cool, then press and release Emergency Stop to clear the fault condition.
References:
PLC INP15: Thermal switch TAS40 status: Green = 1 = okay, Red = 0 = spindle motor overheated
Schematic: Line 118
The way lube pump was supposed to be running, but no pressure was detected on its output pressure switch PS23.
Check oil level in the way lube reservoir. Check circuit breaker CB24, in the center compartment of the control cabinet.
Press and release Emergency Stop to clear the fault.
References:
PLC INP16: Lube output pressure switch PS23 status: Green = 1 = Pressure up, Red = 0 = low or no pressure
Schematic: Lines 66, 118
The hydraulic system was running, but pressure for headstock operations dropped out.
Check the oil level in the hydraulic unit sight glass.
Press Emergency Stop to clear the fault. Release Emergency Stop and check the pressure gage on the back of the headstock. The gage should show about 950 PSI.
References:
PLC INP38: Pressure switch PS25B status: Green = 1 = Pressure up,  Red = 0 = low or no pressure
Machine Parameter 951: Allowable pressure-drop time before fault is reported (ms)
Schematic: Lines 40-43, 134
The control lost communication with one or more of the PLC I/O expansion boards.
Open the control cabinets and check for green "+5V" and "PLC OK" LED indications on each of the expansion boards.
If neither LED is lit, check the 5VDC logic supply from PS2.
If "+5V" is lit, but "PLC OK" is not lit, check the connections at both ends of the gray cables which connects H8 & H9 on the Oak unit to H3 on the two PLCADD1616 boards.
References:
PLC W36: bitmap of detected PLC expansion boards.  3 = two boards detected
Machine Parameter 900: bitmap of expected PLC expansion boards.  3 = two boards expected
Schematic: Lines 59, 107, 121, 131
An attempt was made to run the spindle motor, either to start the spindle or to shift gear ranges, but the tool is unclamped or not fully clamped.
References:
PLC INP26: Switch LS100 status: Green = 1 = Tool unclamped, Red = 0 = tool not unclamped
PLC INP27: Switch LS101A status: Green = 1 = Tool clamped, Red = 0 = tool not fully clamped
Schematic: Lines 126, 127
An attempt was made to start or run the spindle motor, but hydraulic pressure for tool clamping is not adequate.
References:
PLC INP40: Pressure switch PS60B status: Green = 1 = Adequate tool-clamping pressure, Red = 0 = low or no clamp pressure
Schematic: Line 135
An attempt was made to start or run the spindle motor, but hydraulic pressure for spindle bearing preload is not adequate.
References:
PLC INP36: Pressure switch PS23 status: Green = 1 = Adequate spindle preload pressure, Red = 0 = low or no preload pressure
Schematic: Lines 133, 166, 189
An attempt to shift headstock gears did not successfully complete within the allowed time.
References:
PLC OUT20: Shifter slide B solenoid SOL4A status: Green = on = Slide B to high position
PLC OUT21: Shifter slide B solenoid SOL4B status: Green = on = Slide B to low position
PLC OUT22: Shifter Slide D solenoid SOL2A status: Green = on = Slide D to high position
PLC OUT23: Shifter Slide D solenoid SOL2B status: Green = on = Slide D to low position
PLC INP20: Shifter slide B switch LS14A status: Green = 1 = Slide B in high position, Red = 0 = Slide B not in high
PLC INP21: Shifter slide B switch LS14B status: Green = 1 = Slide B in low position, Red = 0 = Slide B not in low
PLC INP22: Shifter Slide D switch LS13A status: Green = 1 = Slide D in high position, Red = 0 = Slide D not in high
PLC INP23: Shifter Slide D switch LS13B status: Green = 1 = Slide D in low position, Red = 0 = Slide D not in low
Schematic: Lines 123-125, 172-175
The PLC program requested display of a message on the screen, but the provided message code was not valid.
This indicates an error in the PLC program. Report the message to your dealer, along with the value in PLC variable W16.
References:
PLC W16: stores the invalid message code
The PLC hardware detected the presence of an I/O expansion board, but the setting of Machine Parameter 900 did not tell it to expect that board in the system.
On this machine, there should be two I/O expansion boards installed, and Machine Parameter 900 should be set to 3.0.
References:
PLC W36: bitmap of detected PLC expansion boards.  3 = two boards detected
Machine Parameter 900: bitmap of expected PLC expansion boards.  3 = two boards expected
Switch LS26 tripped, indicating that the filter on the main hydraulic circuit is clogged.
Clean or replace the filter as soon as practical.
References:
PLC INP42: Switch LS26 status: Green = 1 = okay, Red = 0 = filter clogged
Schematic: Line 136
Switch LS27 tripped, indicating that the filter on the headstock lube hydraulic circuit is clogged.
Clean or replace the filter as soon as practical.
References:
PLC INP43: Switch LS27 status: Green = 1 = okay, Red = 0 = filter clogged
Schematic: Line 137
Switch PS25A opened, indicating that hydraulic operating pressure to the headstock is excessive.
References:
PLC INP37: Switch PS25A status: Green = 1 = okay, Red = 0 = excessive pressure
Schematic: Line 134
Switch PS60A opened, indicating that hydraulic pressure to clamp the drawbar is excessive.
References:
PLC INP39: Switch PS60A status: Green = 1 = okay, Red = 0 = excessive pressure
Schematic: Line 135
A previous servo drive fault condition has been resolved, and cleared with Emergency Stop.
A previous PLC fault condition has been resolved, and cleared with Emergency Stop.
You inadvertently pressed a keyboard combination that is used for keyboard jogging controls, but keyboard jogging features have been disabled on this machine.
A previous fault condition has been cleared with Emergency Stop.
The report_0921180661_vertical.zip and report_0921180661_horizontal.zip file sets that are restored when switching machining formats contain the following files:
| cncm.prm.xml | Machine Parameters | Servo drive and encoder mappings, format selector |
| cncmcfg.xml | Machine Configuration | Axis labels, drive ratios, backlash compensation, etc. |
| cncm.wcs | Work Coordinate Systems | Axis travel limits and G28 return points |
| homelog.txt | Record of axis home-search distances | Needed because Y and Z are different physical axes |
| scale_settings.xml | Linear scale feedback settings | Needed because Y and Z are different physical axes, using different scales |
| report_*.txt | Human-readable record of configuration values | For reference only, has no effect on operation |
Because these files in the control are replaced with the archived files every time you switch between horizontal and vertical formats, any changes that you might have made in Parameters, Configuration, Work Coordinate Systems, or logged homing distances will be lost on the next format switch.
If there is a need to make changes in any of these areas, and have those changes preserved in the future, then you will need to update the archive file(s) that are used in format switching.
To update one of the archive file sets:
If appropriate, switch formats and repeat the above procedure for the other format.
The order of the axis drives; order of the axis definitions in the control configuration menus; and order of the axis jogging controls can vary. Definitions for this machine are as follows:
| Horizontal Format | Vertical Format | ||||||||||||||||||||||||||||||||||||||||||||||||||||||||||||||||||
|---|---|---|---|---|---|---|---|---|---|---|---|---|---|---|---|---|---|---|---|---|---|---|---|---|---|---|---|---|---|---|---|---|---|---|---|---|---|---|---|---|---|---|---|---|---|---|---|---|---|---|---|---|---|---|---|---|---|---|---|---|---|---|---|---|---|---|---|
|
| ||||||||||||||||||||||||||||||||||||||||||||||||||||||||||||||||||
These codes usually only need to be entered once. They are stored on the control a file named cncm.unl.xml. They should be kept on file in case that file is ever lost.
Serial Number: 103358 -- Key A (plain): 0921180661
The following are necessary to unlock software features:
| Option | Parameter # | Parameter Value |
| Extended WCS | 205 | 35136.5083 |
| Probing | 209 | 37696.0049 |
| Auto Tool Measuring | 211 | 47936.7143 |
| Rigid Tapping | 215 | 44096.6079 |
| Coordinate System Rotation | 220 | 58944.2451 |
| USB MPG | 226 | 50560.8307 |
| Scales | 232 | 3712.9015 |
| Permanent Unlock | 298 | 61944.0830 |
| Intercon | 300 | 58104.9766 |
08-Mar-2022 MBL
![]()
